Opening Balance Master
Opening Balance Master - User Guide
1. Introduction 📝
The Opening Balance Master is the “Starting Line” for your ERP’s financial journey. It is used to record the closing balances of the previous fiscal year (or your old accounting software) into the current system. These balances are the foundation upon which your current year’s Ledger, Trial Balance, and Balance Sheet are built.
Key Objectives of Opening Balance Master:
- Financial Continuity: Ensure that your business wealth (Assets/Liabilities) is carried forward correctly.
- Division-Wise Tracking: Break down balances by department or physical location (Divisions).
- Migration Bridge: Provide a structured way to move data from legacy systems during the initial “Go-Live” phase.
2. Structural Breakdown 🏗️
The system records balances based on three mandatory links:
- Year Label: Every balance is tied to a specific Financial Year (e.g.,
2024-2025). - Division: Every balance must belong to a specific operational unit (e.g., Delhi Branch, Mumbai Factory).
- Account (MIS Name): The system identifies the correct Ledger/Sub-ledger using the unique MIS Name defined in the Account Master.
3. Data Entry & Bulk Import 📥
Because opening balances often involve hundreds of ledger heads, the system prioritizes Excel-based bulk migration.
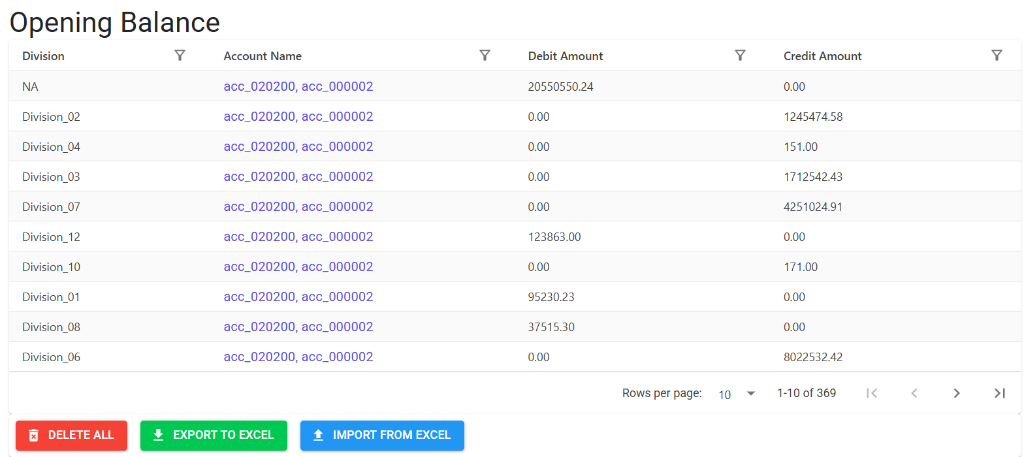
The Index Page
The Opening Balance Index provides a summarized view of all account balances carried forward into the current financial year. It details the division, account name, and the specific debit or credit amounts.
Opening Balance Details
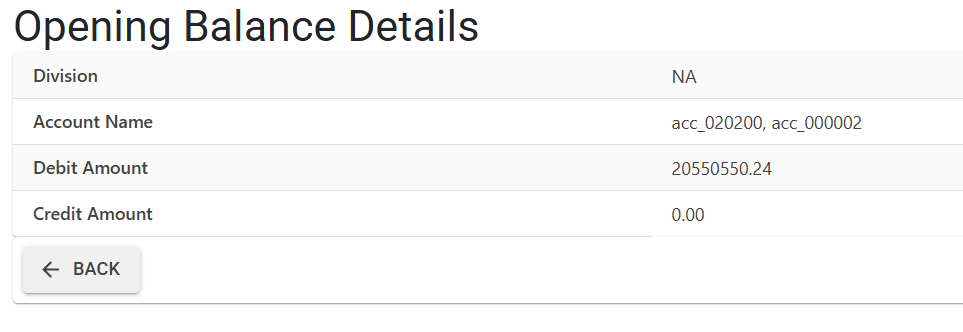
Clicking on an account name opens the Details View, which displays the specific allocation for that ledger head:
- Division-Wise Allocation: See exactly which operational unit the balance belongs to.
- Balance Accuracy: Verify the specific Debit or Credit amounts as they appear in the system.
- Management Actions: Use the Import from Excel button for bulk migrations or Delete All to clear a year’s balances if a complete reset is required.
📥 Excel Import Workflow
- Download Model: Get the standard template from the import screen.
- Column Definitions:
- Division: The 2-digit code for the branch.
- MIS Name: The unique mapping name from Account Master.
- Debit/Credit: Marked as
DorC. - Amount: The numerical value (up to 2 decimal places).
- Upload & Pre-Check: The system runs a rigorous “Pre-flight Check” before accepting any data.
4. Import Validations & Error Codes 🛡️
To prevent financial corruption, the system will reject your Excel file if it finds any
5. Daily Usage & Integration 🔄
📊 Financial Reporting
- Trial Balance: The opening balances appear in the “Opening” column.
- Balance Sheet: Reflects these values as the company’s “Starting Wealth” for the year.
- Ledger Statement: The first line of any ledger report is always the Opening Balance derived from this master.
6. Guidelines and Best Practices ⚠️
Entry Standards
- Balancing the Books: Ensure that the Total Debits equal Total Credits in your Excel file. If they don’t, your Trial Balance will be “Out of Sync.”
- One-Time Entry: Typically, opening balances are entered once a year (on April 1st). Avoid making frequent changes here as it affects all subsequent financial reports.
7. Deletion & Modification Rules 🛡️
🚫 Safety Preventions
- Bulk Delete: The system allows you to clear an entire year’s opening balances (
Delete All) only before the first transaction of the year is finalized. - Post-Migration Locking: It is highly recommended to disable editing rights for this module once the opening balances are audited and verified.
✏️ Audit Trail
If your company has Audit Trail enabled, the system enforces a strict “Manual Only” policy for opening balance corrections to ensure every change is logged with a user ID and timestamp.
8. Migration Tips 💡
- Party-wise Breakup: When entering opening balances for “Sundry Debtors,” ensure you enter the balance for each sub-account (Customer) individually to keep your AR/AP aging reports accurate.
- Division Sync: If your company tracks profit/loss by division, double-check that your Bank/Cash opening balances are assigned to the correct branch code.
- Trial Balance Match: Always compare your ERP’s Opening Trial Balance against your old software’s closing statement before proceeding with new entries.