Invoice Digital Signature
1. Introduction 📜🖋️
In modern manufacturing, supply chain, and B2B commerce, physical printing, manual signing, and postal dispatch of tax invoices are slow, expensive, and legally vulnerable to tampering.
The Invoice Digital Signature module in ERP Crystal enables businesses to automatically generate and issue cryptographically signed, tamper-proof PDF sales invoices compliant with the Information Technology Act, 2000 and GST Rule 46.
Every generated invoice incorporates a dual-layer verification mechanism:
- Visual Digital Seal: A clearly styled, green-bordered “DIGITALLY SIGNED” box rendered above the invoice footer indicating the authorized dispatch location and the exact Indian Standard Time (IST) signing timestamp.
- Cryptographic X.509 Digital Signature: A secure digital signature embedded into the PDF using industry-standard SHA-256 and PKCS#12 (
.pfx/.p12) certificates. When opened in Adobe Acrobat Reader or any standard PDF viewer, the document displays the trusted green badge: “Signed and all signatures are valid”.
At a Glance:
| Attribute | Details |
|---|---|
| Feature Configuration | System Tools > Common Masters > Company Master |
| Operational Trigger | Sales > Transactions > Sales Invoice > Other Operations |
| Supported Certificate Formats | PKCS#12 (.pfx, .p12), Max file size 2 MB |
| Signing Standard | PDF Digital Signature (SHA-256 / RSA X.509), Adobe Acrobat compliant |
| Security Architecture | AES-encrypted password storage, ephemeral in-memory key loading, atomic sign & swap |
| Primary Beneficiaries | Billing Executives, Dispatch Managers, CFOs, Compliance Auditors |
2. End-to-End Workflow 🔄
The diagram below outlines how the digital signature is configured once in Company Master and automatically applied to every customer invoice:
flowchart TD
    A["System Parameter
('EnableDigitalSignature' = 'Y')"] --> B["Company Master
"]
    B --> C["Click 'Digital Signature Configuration'
(CompanyDigitalSignDialog)"]
    C --> D["Upload .pfx / .p12 Certificate
+ Enter Password"]
    D --> E["Automatic Validation &
AES Encrypted Storage"]

    subgraph Invoicing Pipeline ["Automated Invoicing Pipeline"]
        F["Sales Invoice Generated
(/invoiceotheroperation)"] --> G["QuestPDF Builds Layout +
Visual 'DIGITALLY SIGNED' Box"]
        G --> H["PdfSigningService Embeds
X.509 Cryptographic Signature"]
        H --> I["Download / Email Tamper-Proof
PDF Invoice to Customer"]
    end

    E -.-> F

    style C fill:#e0e7ff,stroke:#6366f1,stroke-width:2px
    style E fill:#ecfdf5,stroke:#10b981,stroke-width:2px
    style G fill:#fef3c7,stroke:#f59e0b,stroke-width:2px
    style H fill:#ede9fe,stroke:#8b5cf6,stroke-width:2px
    style I fill:#dcfce7,stroke:#16a34a,stroke-width:2px
3. Prerequisites & Access Controls 🔐
Before using digital signatures on sales invoices, ensure the following requirements are met:
- System Parameter Enabled:
- The system parameter
EnableDigitalSignaturemust be configured withsyscondition = 'Y'andisactive = 'Y'in company parameters. - When enabled, the digital signature controls become visible in Company Master and the PDF generation engine.
- The system parameter
- User Role Permissions:
- Modifying certificates or passwords requires role authorization for CompanyMstModify.
- Generating and printing invoices requires standard Invoice permissions.
- Digital Signature Certificate (DSC):
- A valid Class 2 or Class 3 commercial Digital Signature Certificate in PKCS#12 format (
.pfxor.p12). - The certificate must include a Private Key.
- The certificate must have the DigitalSignature key usage flag enabled.
- The file size must not exceed 2 MB.
- A valid Class 2 or Class 3 commercial Digital Signature Certificate in PKCS#12 format (
4. Step-by-Step Configuration Walkthrough 🚀
Step 1: Open Company Master & Check Signature Status
- Navigate to System Tools > Common Masters > Company Master.
- If
EnableDigitalSignatureis active, the Company Details table displays two dedicated rows:- Digital Signature Password: Displays
••••••••if a password is saved, orNot Configured. - Digital Signature: Features a Digital Signature Configuration button with a verified shield icon (
VerifiedUser).
- Digital Signature Password: Displays
- Click Digital Signature Configuration to open the management modal.
Step 2: Inspect Certificate Health in the Dialog
When the Digital Signature Configuration dialog opens, it automatically checks the current server certificate status and displays one of the following live diagnostic alerts:
- 🟢 Certificate is Active & Valid:
- Displays the certificate’s Subject (Organization & Signer Name).
- Displays the exact expiration date and countdown: “Expires in X days (YYYY-MM-DD)”.
- If the certificate is within 30 days of expiry, a warning note is automatically flagged: “Warning: Certificate expires soon. Renewal is recommended.”
- ℹ️ No Certificate Installed:
- Displays: “No digital signature certificate is currently installed on the server.”
- 🔴 Validation Failed / Expired:
- Outlines specific failure causes (e.g., certificate expired, missing private key, or password mismatch).
Step 3: Upload and Activate Certificate
To install a new certificate or update an existing one:
- In the Digital Signature Password field, enter the private key password that protects your
.pfxor.p12file. - Under Certificate File (.pfx / .p12), click Select Certificate File.
- Browse and select your
.pfxor.p12certificate file (up to 2 MB). The interface confirms your selection, showing the file name and size in KB. - Click Upload & Activate Certificate.
- The system automatically:
- Uploads and verifies the certificate against the provided password.
- Confirms private key presence and certificate validity.
- Securely saves the certificate file to the tenant directory.
- Encrypts the password in the database using strong AES symmetric encryption.
- Displays a green confirmation snackbar: “Certificate uploaded, verified, and activated successfully!”
Step 4: Generate & Print Digitally Signed Invoices
Once the certificate is configured, digital signing happens automatically during invoice generation:
- Navigate to Sales > Transactions > Sales Invoice.
- Open any active invoice and navigate to Other Operations.
- Click Print Invoice (or trigger batch PDF generation / email dispatch).
- The system seamlessly:
- Validates the active certificate and password in real time.
- Generates the QuestPDF invoice layout.
- Adds the visual DIGITALLY SIGNED seal.
- Cryptographically stamps the PDF document with SHA-256.
- Opens or downloads the signed PDF ready for delivery.
Step 5: Verify the Signed Invoice Document
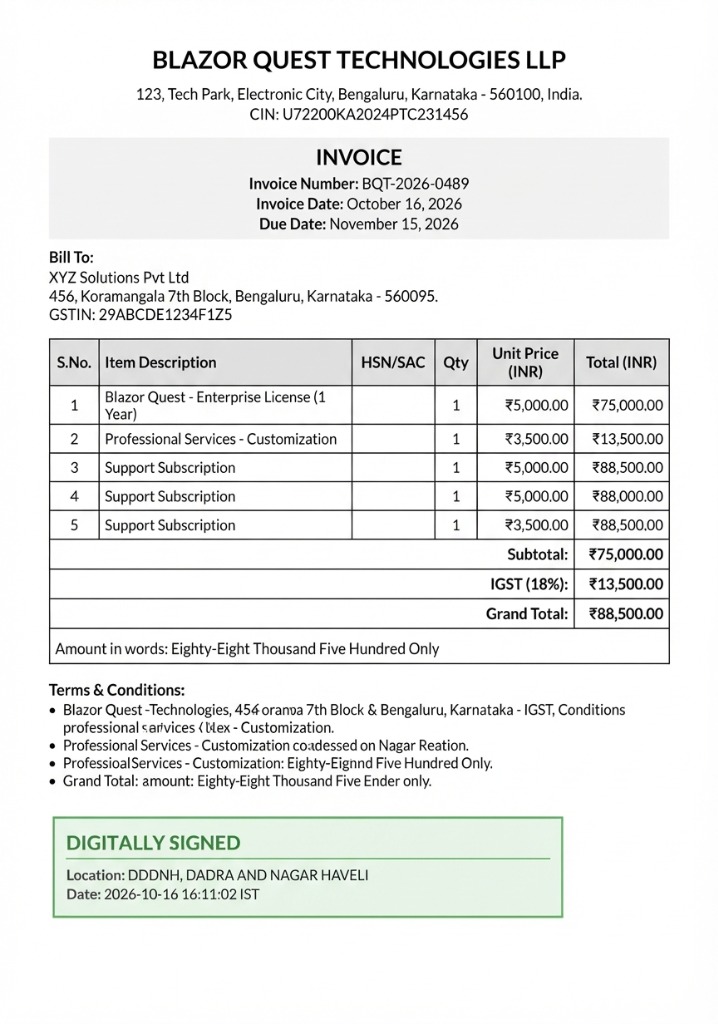
When you open the generated invoice PDF, you will observe two levels of verification:
A. Visual Verification Seal (On Document)
Located on the bottom left of the invoice above the footer notes:
- Header:
DIGITALLY SIGNED(styled in green with clean framing). - Location: Mentions the factory or dispatch location (e.g.,
Location: DDDNH, DADRA AND NAGAR HAVELI). - Timestamp: Exact date and time in Indian Standard Time (e.g.,
Date: 2026-10-16 16:11:02 IST).
B. Cryptographic Verification (In Adobe Acrobat Reader)
When customers or auditors open the invoice in Adobe Acrobat Reader:
- A blue or green signature bar appears across the top:
“Signed and all signatures are valid.”
- Opening the Signature Panel reveals:
- Signer’s identity (matching the company certificate).
- Assurance that the document has not been altered or modified since it was signed.
- Certificate chain and signing authority.
5. Security & Technical Architecture 🧠
The Digital Signature engine is built for high-throughput enterprise manufacturing environments with strict security safeguards:
flowchart LR
    A["Raw Invoice Data"] --> B["QuestPDF Engine
(Render Layout & Visual Box)"]
    B --> C["Temporary File
(.tmp isolation)"]
    C --> D["PdfSigningService
(Load Ephemeral Key & Sign SHA-256)"]
    D --> E["Atomic File Swap
(Move to Final Path)"]
    E --> F["Tamper-Proof Signed PDF"]

    style B fill:#eff6ff,stroke:#3b82f6
    style D fill:#f5f3ff,stroke:#8b5cf6
    style F fill:#ecfdf5,stroke:#10b981
Key Security & Reliability Pillars
| Architecture Component | Implementation Detail | Enterprise Benefit |
|---|---|---|
| AES Password Encryption | Passwords are encrypted before storing in the database using enterprise-grade AES symmetric encryption. | Prevents exposure of certificate credentials in database backups or logs. |
| Ephemeral Key Loading | Keys are loaded with X509KeyStorageFlags.EphemeralKeySet directly into memory. | Private keys are never persisted to temporary server folders or Windows certificate stores. |
| Striped Concurrency Locks | Signature operations utilize a 64-bucket hash-partitioned lock array (_pdfSignLocks). | Prevents concurrent PDF write conflicts while maintaining blazing-fast throughput during high-volume month-end billing. |
| Atomic File Replacement | Signing writes to an isolated .tmp file before performing an atomic replace. | Guarantees that clients never download partially signed or corrupted files if an unexpected power or process disruption occurs. |
| Automatic File Cleanup | If signing encounters an error, both the .tmp file and unsigned PDF are immediately purged. | Prevents accidental delivery of uncertified or broken files. |
6. Troubleshooting & Common Error Messages ⚠️
If an issue occurs during certificate upload or invoice printing, ERP Crystal surfaces clear diagnostic messages. Use the table below for rapid resolution:
| Error Message | Root Cause | Solution |
|---|---|---|
| “Certificate is corrupted or password is invalid.” | The password entered does not match the private key password of the .pfx/.p12 file. | Re-enter the exact password supplied when exporting the digital signature certificate. |
| “Certificate has expired on [Date].” | The certificate has passed its validity date (NotAfter). | Renew your Digital Signature Certificate with your certifying authority (CA) and upload the new .pfx file. |
| “Certificate is not yet valid.” | The current system date is prior to the certificate start date (NotBefore). | Verify your server system date and time synchronization (NTP). |
| “Certificate does not contain a private key.” | The uploaded file contains only a public certificate (.cer / .crt) rather than a full PKCS#12 bundle. | Export the certificate from your token/keystore ensuring that “Export the private key” is selected. |
| “Certificate does not have DigitalSignature key usage.” | The certificate was issued without the DigitalSignature key usage extension. | Ensure your certificate provider issues an X.509 certificate designated for Document / Digital Signing. |
| “Certificate file must not exceed 2 MB.” | Uploaded file size exceeds the 2 MB safety cap. | Standard .pfx files are typically under 50 KB. Check that unnecessary auxiliary files were not bundled. |
| “Only .pfx or .p12 certificate files are allowed.” | An unsupported file extension was selected. | Save or convert your certificate bundle to .pfx or .p12. |
| “No certificate is available.” | Digital signature is enabled, but no certificate has been uploaded to the server for this company. | Open Company Master > Digital Signature Configuration and upload your .pfx certificate. |
7. Best Practices for Enterprise Invoicing 💡
- Monitor the 30-Day Expiry Warning: Keep an eye on the expiration banner in Digital Signature Configuration. When the badge warns that the certificate expires soon, arrange renewal promptly to prevent billing disruptions.
- Secure Certificate Backup: Maintain a secure, password-protected backup of your
.pfxfile and credentials in an organization password manager or hardware vault. - Keep Dispatch Locations Accurate: Ensure Unit and Company address settings are maintained accurately, as the active unit location is printed inside the visual signature box.
- Direct Customer Invoicing: When emailing invoices to customers directly from ERP Crystal, recipients with Adobe Reader will automatically see the authentic green verification ribbon without requiring manual signatures.