Sales Order
Sales Order Module - User Guide
⚡ Quick Start: 3-Minute Fast Track
For experienced users who need to create an order immediately:
- Header: Click Create New, pick Party, and enter PO No/Date.
- Items: Search for Item, enter Qty, and verify the Rate.
- Save & Confirm: Ensure all item statuses are OK, then click Confirm.
- Done: The order is now live for Production and Inventory teams.
🗺️ Process Flow: CRM to Invoice
graph LR
    Enquiry[Sales Enquiry] --> Quotation[Quotation/Proforma]
    Quotation --> SO[Sales Order]
    SO --> Production[Production Plan]
    Production --> Invoice[Sales Invoice]
    Invoice --> Dispatch[Dispatch Summary]

    style SO fill:#f9f,stroke:#333,stroke-width:2px
✅ Prerequisites Checklist
Before creating your first Sales Order, ensure:
- Party Master: Customer is registered with correct GST and Address.
- Brand Master: Relevant item brands are configured.
- HSN Codes: All inventory items have correct HSN and GST rates.
- Salesmen: Sales officers are assigned to the party/branch.
1. Introduction 📝
The Sales Order module is a core part of the ERP system designed to manage the entire lifecycle of customer orders. It captures critical data like pricing, delivery dates, and shipping requirements.
In the overall business flow:
- It usually follows a Sales Enquiry or Quotation.
- It serves as the base for Production Planning and Inventory Allocation.
- It eventually leads to Sales Invoicing and Dispatch.
Typically, this module is used by Sales Officers, Production Coordinators, and Accounts Teams to ensure orders are fulfilled on time and within credit limits.
2. Getting Started with Sales Orders 🚀
Accessing the Module
To access the Sales Order module, navigate to the Sales Order section from the main menu.
The Index Page
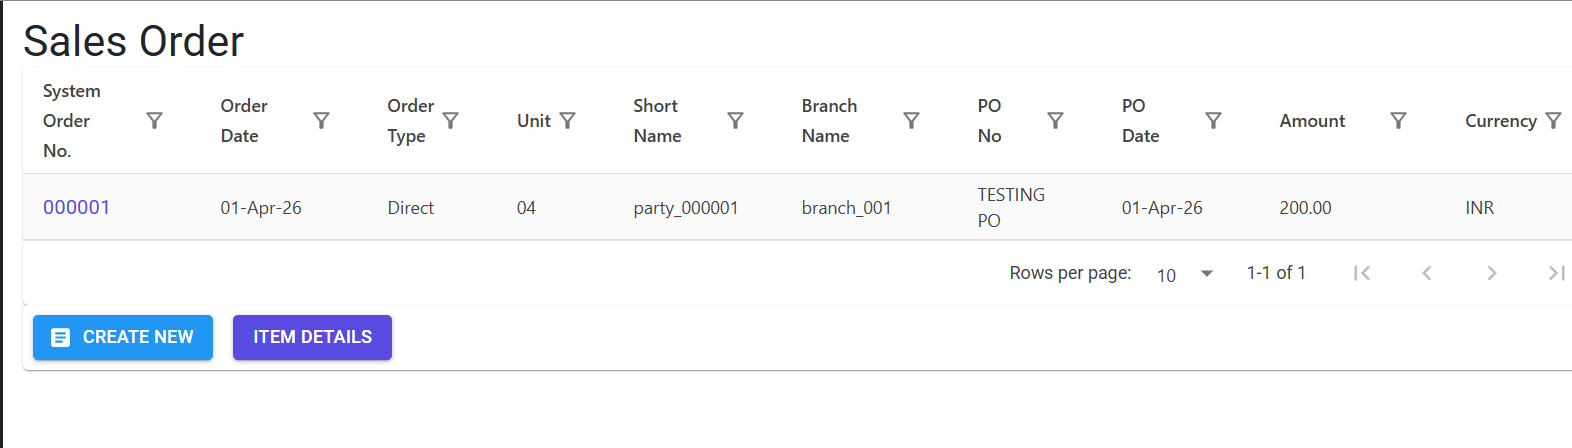
Upon opening, the Index Page displays a comprehensive list of all existing Sales Orders. Here, you can:
- Search/Filter: Look for specific orders by Order Number, Date, or Party Name.
- View Details: Click on an Order Number to view its full details.
- Track Status: See which orders are pending, confirmed, or completed.
Starting a New Order
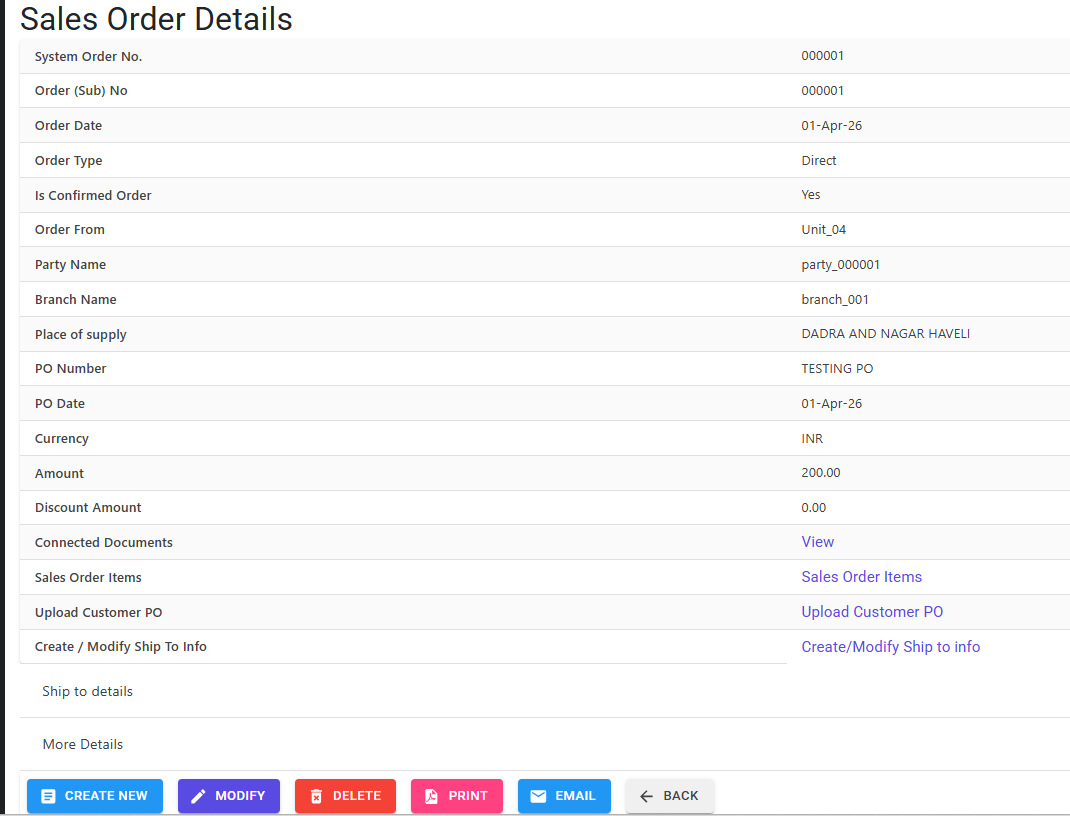
To create a new order, click the “Create New” button. The system follows a two-step process:
- Header Creation: Enter general information like Party details and PO numbers.
- Item Entry: Add specific products or services to the order.
3. Features ✨
The Sales Order module is packed with features to handle various business scenarios:
- 🏷️ Multiple Order Types: Create Direct Orders, Proforma Invoices, or Quotations.
- 📋 Line Item Management: Add, modify, or delete specific items. The system automatically fetches HSN codes, GST rates, and lead times.
- 📁 Bulk Import: Use the Excel Import feature to add hundreds of items at once using a standardized template.
- 🚚 Freight Management: Specify if freight is mandatory. The system can prompt you to add a dedicated freight item to ensure costs are captured.
- 💳 Credit Limit Control: Real-time checking of the customer’s outstanding balance against their allowed credit limit.
- 🔓 Special Authorization: If an order exceeds a credit limit, the system triggers a secure authorization process.
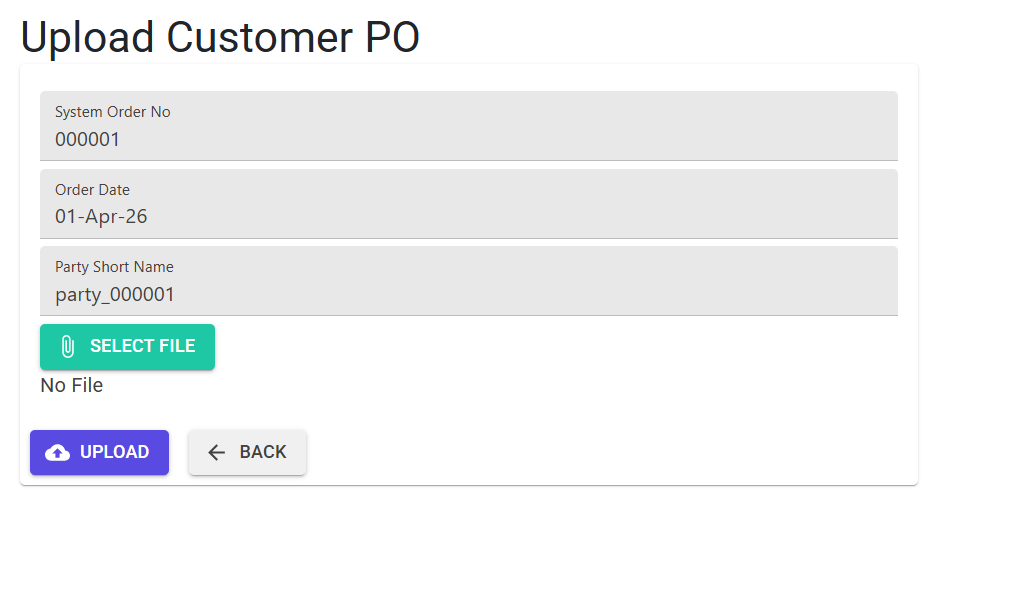
- 📂 Document Management: Upload and store a digital copy of the customer’s physical Purchase Order (PO) for easy reference.
- ✅ Confirmation Workflow: Convert Quotations or Proforma Invoices into Confirmed Orders once the customer gives the green light.
- 📧 Communication: Directly Print PDF versions or Email the order confirmation to the customer from within the system.
4. Complete Flow 🔄
The lifecycle of a Sales Order typically follows these steps:
Create Header
- Select the Order Date and Order Type.
- Pick a Party (Customer) and their specific Branch.
- Enter the Customer PO Number and Date.
Add Line Items
- Search for Items and select the appropriate Brand.
- Enter the Quantity and either use the system-calculated Rate or enter it manually.
- Set the Required By Date and Planned Date for delivery.
Manage Shipping Info
- Define the Ship To details (Address, GSTIN, Location) if they differ from the main party address.
Attach Documents
- Upload the customer’s PO file.
Confirm Order
- For Quotations/Proformas, use the “Convert to Confirmed Order” action to finalize the order.
Post-Save Actions
- The order is then visible to the Production team for planning and the Warehouse team for dispatch.
5. Validations and Error Handling ⚠️
The system includes robust checks to prevent incorrect data entry:
| Validation Type | What is checked? | Error Message / Action |
|---|---|---|
| Required Fields | Missing Party, Unit, PO No, or Items. | Red text highlights the missing field. |
| Credit Limit | If customer’s debt exceeds their limit. | Triggers a Special Authorization screen. |
| Duplicate PO | If the same PO number is used again for the same customer. | Error message shows previous order number. |
| Book Closure | If trying to enter an order in a closed financial period. | Redirects to an “Access Denied” page. |
| BOM Check | If an item requires a BOM but doesn’t have one. | Informational alert appears during item entry. |
| Freight | If freight is mandatory but no freight line exists. | Warning alert: “Freight Item needs to be added”. |
| Status OK | All items must have an “OK” status. | Error message: “All items must have Status OK”. |
6. Tools / Smart Features 🔧
To make order entry faster and more accurate, use these built-in tools:
- 🔍 Auto-Complete: Start typing a Salesman or Item name, and the system will suggest matches.
- 🧠 Smart Fetching: Selecting a Branch automatically fills the Supply State, Salesman, Payment Terms, and Credit Days based on the Master data.
- 🔘 Manual Rate Toggle: You can choose between using the system’s pre-defined price list or entering a custom rate for special deals.
- 🔗 Linked Documents: The Connected Documents link allows you to instantly see all Invoices or GRNs related to a specific order without leaving the page.
- 🧮 Automated Calculations: The system instantly calculates GST, Discounts, and Total Amounts.
7. Reports Related to Sales Order 📊
The module provides several reports to help you analyze your sales:
- 📄 Sales Order Confirmation (PDF): A professional document to send to customers.
- 📋 Sales Order Register: A detailed list of all orders within a date range, exportable to Excel.
- ⏳ Pending Order Report: Shows orders that are yet to be fully dispatched or invoiced.
- 📈 Delivery Performance: Analyzes how well the business is meeting the “Required By” dates.
- 📢 Marketing Activities: Tracks orders generated from specific marketing efforts or campaigns.
- 🚚 Dispatch Summary: Provides a quick overview of what has been shipped against existing orders.
- 📉 Short Close Report: Lists orders closed manually with reason.
8. Pre-settings / Configurations ⚙️
Before using the Sales Order module, ensure the following are configured:
- 🏗️ Party/Branch Master: Customers must be registered with correct GST and address info.
- 📦 Inventory Master: Products must have correct HSN Codes, Brands, and GST Rates.
- 👤 Salesmen Master: Names must be configured to assign responsibility.
- 🛠️ System Parameters:
- Credit Limit Check: Set to “Y” to enable outstanding balance checks.
- Booking No: Set to “Y” if your business requires a separate booking reference.
- 💳 Payment Terms: Standard terms (e.g., 30 Days, Advanced) should be pre-defined.
9. Best Practices / Tips 💡
- Verify Master Data: Always ensure the Item and Party master data is up-to-date to avoid manual corrections during order entry.
- Use Excel Import: For large orders (e.g., 50+ lines), use the Excel Import tool to save time and reduce typing errors.
- Check Statuses: Before trying to confirm an order, ensure all items are marked “OK” in the line item index.
- Upload POs: Always upload a scan of the customer’s PO for a “single source of truth”.
10. Additional Observations 🔍
- Confirmed Orders: Remember that once an order is “Confirmed”, you cannot modify it. If a change is needed, it must be addressed through a specific amendment process.
- Freight Mandatory: If you find yourself unable to confirm an order, check if “Is Freight Mandatory” is set to “Yes” and ensure a freight line is added.
- Special Auth: Only authorized managers can bypass credit limit errors.