Remark Master
Remark Master - User Guide
1. Introduction 📝
The Remark Master is a centralized tool used to maintain a consistent library of notes and comments used during various business transactions. Instead of manually typing common reasons or descriptions, users can select from this pre-defined list, ensuring that data remains uniform and professional across all company records.
Why use the Remark Master?
- Consistency: Eliminates variations in spelling or terminology for the same reason.
- Speed: Accelerates data entry by offering a quick search-and-select interface.
- Better Reporting: Grouping transactions by standardized remarks allows for more accurate analysis (e.g., “Reason for Rejection”).
2. Getting Started 🚀
Accessing the Module
The Remark Master can be found under the Supply Chain Setup menu.
The Index Page
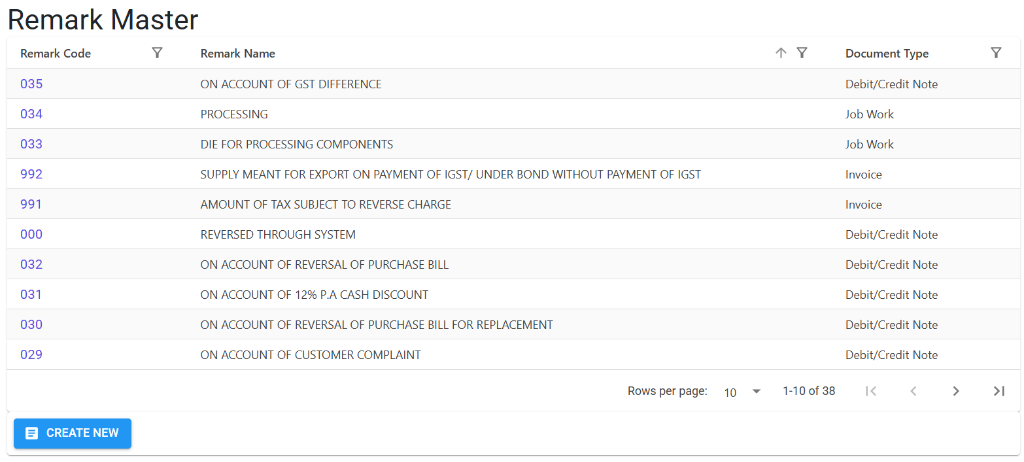
The Index Page provides a comprehensive list of all pre-defined remarks. You can search by code, name, or document type to find the exact entry you need.
Remark Details
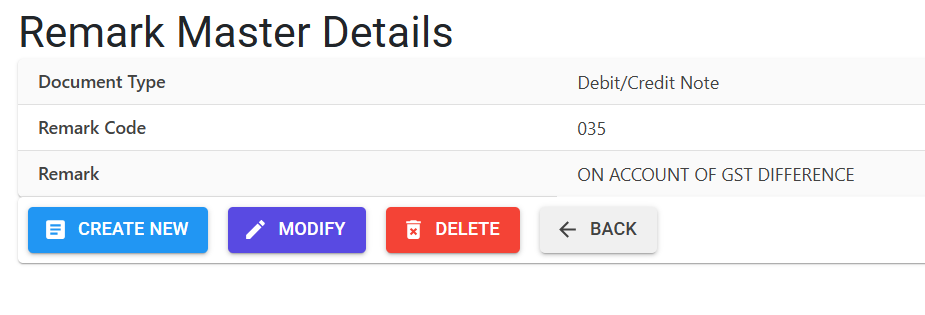
Clicking on a remark code allows you to view its full details. From this screen, you can manage the entry:
- Create New: Add a new remark to the library.
- Modify: Update the description or document assignment.
- Delete: Remove unused remarks (the system will block deletion if the remark is linked to existing transactions).
3. Key Features ✨
🏷️ Categorized Selection
Remarks are grouped by the type of document they belong to. For example, a “Damaged in Transit” remark can be assigned only to Sales Rejections, keeping the dropdown lists clean and relevant.
📝 Clear Descriptions
Each entry allows for a detailed description (up to 100 characters), providing enough space to clearly explain the purpose of the note.
🛡️ Built-in Safeguards
The system automatically monitors the library to prevent overcrowding and data errors, maintaining a professional and manageable list of notes.
4. The Business Flow 🔄
Identify the Category
- Decide which module the remark belongs to (e.g., Debit Note, Gate Pass, Quality Check).
- Selecting the correct document category ensures the remark appears in the right screen later.
Define the Remark
- Type a clear and concise description of the note.
- The system will verify that this description hasn’t already been used to prevent redundancy.
Application in Transactions
- When creating a transaction (like a Gate Entry), click the Remarks field.
- Choose from the standardized list.
- The system automatically links your choice, ensuring it appears correctly on all printouts and reports.
5. Guidelines and Logic ⚠️
Entry Standards
- Uniqueness: The system prevents duplicate names. If a similar remark already exists, you will be prompted to use the existing one or create a distinctly different one.
- Content Limit: Descriptions should be descriptive but concise, with a maximum limit of 100 characters.
- Library Capacity: To ensure the system remains fast and user-friendly, the master is designed to hold up to 990 standardized remarks.
Smart Sorting
- All remarks are automatically sorted and assigned a unique identification sequence by the system, ensuring they can be found easily in searches.
6. Usage Across the System 🛡️
Standardized remarks are vital for the following modules:
- 🚛 Gate Entry & Exit (In-Out Register): For recording reasons for arrival/department.
- 🛠️ Job Work: Essential for tracking specific instructions for vendors.
- 💰 Debit & Credit Notes: Standardizing reasons for price or quantity adjustments.
- 📋 Quality Assurance: Categorizing results or specific check-points.
7. Data Integrity & Safety 🛡️
To maintain the historical accuracy of your audit trails, the system implements a Secure-Link policy:
- Active Link Check: You cannot delete a remark if it has been used in even a single transaction (Invoice, Voucher, or Gate Pass).
- Usage Count: If you try to delete an active remark, the system will inform you exactly how many documents are currently using it.
8. Best Practices / Tips 💡
- Be Specific: Instead of just “Problem,” use “Packaging Damage” or “Quality Mismatch” for better reporting.
- Avoid Duplication: Before creating a new remark, use the filter in the index to see if a similar one already exists.
- Keep it Professional: Remember that these remarks often appear on customer-facing documents and government GST reports.
- Periodic Cleanup: Regularly review unused remarks to keep your selection lists efficient and up-to-date.