Manage Header & Footer
Manage Header & Footer - User Guide
1. Introduction 📝
The Manage Header & Footer tool gives you full control over the visual branding of your ERP-generated documents. Instead of waiting for technical support to change a logo or address, you can use this interface to upload your own custom image files that will appear on the top (Header) and bottom (Footer) of your invoices, vouchers, and reports.
Key Objectives:
- Brand Autonomy: Instantly update logos, company names, and addresses.
- Multi-Unit Branding: Set different headers for different factory units or office locations.
- Document Professionalism: Ensure all printed outputs maintain a high-quality, uniform look.
2. Interface Walkthrough 🏗️
Accessing the Module
To access the Manage Header & Footer tool, navigate to System Tools > Other Masters > Manage Header/Footer from the main menu.
The Manage Interface
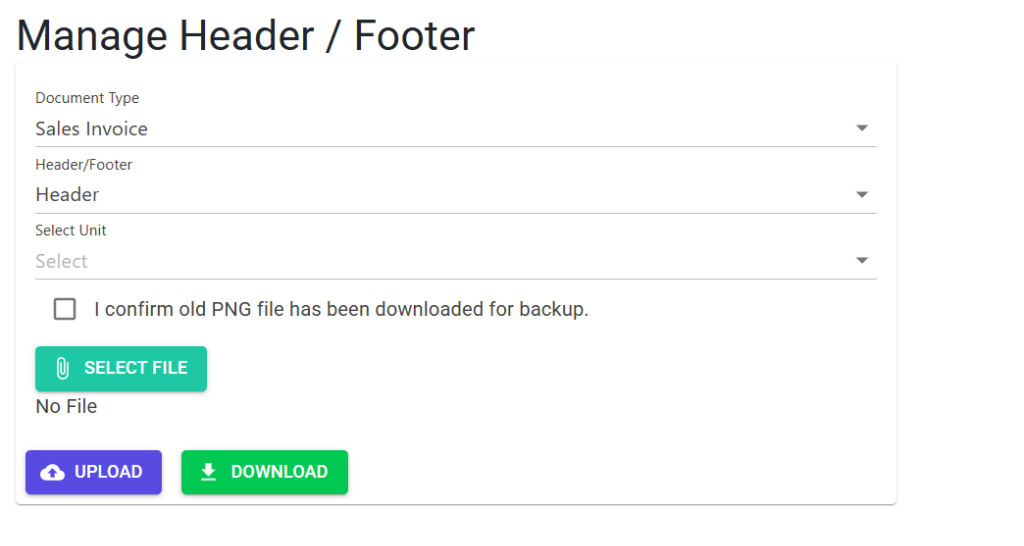
The Manage Header / Footer screen is a streamlined tool designed for quick branding updates. Key features include:
- Document and Type Selection: Choose the specific record type (e.g., Sales Invoice) and placement (Header/Footer).
- Unit Customization: Select the business unit the branding applies to.
- Safety Confirmation: A mandatory checkbox ensuring you have backed up existing files before overwriting.
- Management Actions: Use Select File to pick a new
.png, Upload to apply it, or Download to retrieve the currently active file.
3. Supported Documents 📄
You can customize the layout for the following document types:
- Sales: Invoices (Local/Export), Order/Proforma Invoices (OCPI), Debit/Credit Notes.
- Inventory: Purchase Indents, GRNs (Goods Received Notes).
- Production: Job Work & Miscellaneous Job Work.
- Finance: Bank/Cash Vouchers, Journal Vouchers (JV).
- HR: Employee Pay Slips.
4. Image File Requirements 🖼️
To ensure your documents look crisp and professional, your uploaded images must follow these strict rules:
| Requirement | Specification |
|---|---|
| File Format | Must be .png (Portable Network Graphics). |
| File Size | Maximum 1 MB. |
| Background | Transparent or White (recommended) to blend with the document. |
| Resolution | High-resolution images are recommended for sharp printing. |
5. Usage Guidelines 📋
Step 1: Selection
- Navigate to System Tools > Other Masters > Manage Header/Footer.
- Choose the Document Type you want to update.
- Choose Header (Top of the page) or Footer (Bottom of the page).
- Note: Footers are not available for Vouchers, JVs, or PaySlips.
Step 2: Unit/Division Specificity
- Unit-Specific: For Invoices or GRNs, you can select the specific Unit (e.g., Unit 01) if your units have different addresses or logos.
- Division (Vouchers): For Bank/Cash Vouchers, you can choose between Company headers or Personal headers.
Step 3: Backup & Upload
- Backup (Recommended): Use the Download button to save a copy of your current header/footer before replacing it.
- Confirm Backup: Check the “I confirm old PNG file has been downloaded” box.
- Upload: Click Select File, choose your new
.png, and click Upload.
6. Deployment Logic & Safety 🛡️
- Instant Updates: Once uploaded, the change is instant. The next invoice you generate will automatically use the new image.
- Naming System: The ERP automatically renames your file to match the internal system (e.g.,
Invoice_Header_01.png). You don’t need to worry about file naming. - Logging: Every branding change is recorded in the Audit Log (MFGLOG), capturing the user’s name and the exact time of the update.
7. Common Troubleshooting 🔍
Image looks stretched or blurry
- Solution: Ensure your PNG has an appropriate aspect ratio. Headers are usually wide and short. Check the resolution of your original file.
Downloaded file shows “Image not found”
- Solution: Ensure you have selected the correct Document Type and Unit before clicking download. If no image was ever uploaded for that combination, the system will show an error.
Footer option is missing
- Solution: Certain documents like PaySlips or Vouchers are designed to only have headers. The footer option is intentionally disabled for these types.
8. Best Practices 💡
- Test First: After uploading a new header, generate a “Draft” invoice to see how it looks on the final PDF before finalizing real transactions.
- Keep White Space: Leave a small margin of white space around your logo in the PNG to prevent it from touching the edges of the page.
- Backup Regularly: Keep a folder on your local computer with all your branding PNGs for quick restoration if needed.